Serials Setup
Settings
There are several settings you will want to change for your login when working in the Serials function.
Go to Admin – Settings.
On the New Records tab, look at the bottom part of the screen under New Record Templates. After Checkin, click on the down arrow and select your library’s serials template for checkin cards. After item, do the same for your library’s magazine item template. See Templates below for more help with templates.

If you will be adding new bib records for magazines, on the very bottom of that screen, after Records to attach to new bibliographic records: check the box in front of Checkin.
![]()
Click Save Settings to save your changes.
Options
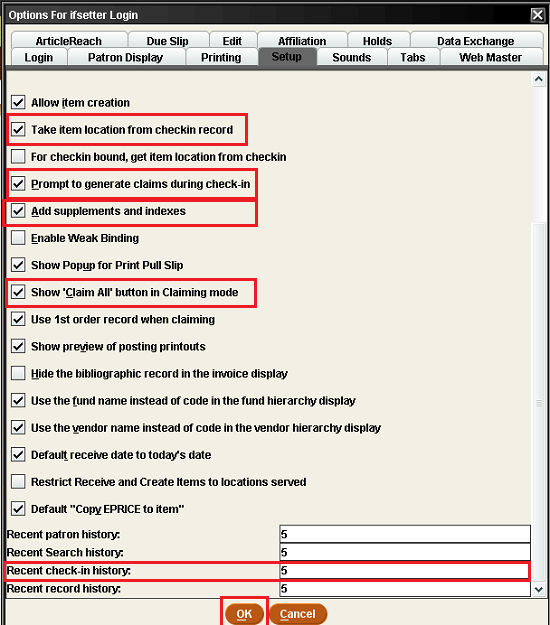
There are several options you can choose to enable or change. Go to Admin – Options.
On the Edit tab, look at the section for “Display which box note on the checkin card.” There are two different notes you can add to a checkin box; one is meant for staff, the other for the public. Here you can choose which to display when you are looking at the box in Sierra. It is recommended to choose Public note, as that does display to the public and it would be visible to any staff working in the record. Click OK to save your choice.

On the Setup tab, there are several options to consider.
In the top group, only the last one concerns Serials. It is “Always show checkin dialog.” This refers to the pop-up window that shows the covers date and volume and issue numbers. If you want to see that every time you checkin an issue, leave the box checked. If you don’t want it to pop-up (and there is no reason to have it do so), uncheck the box.
![]()
In the bottom group, consider these options:
If you want the location code in the item record to come from the checkin card, check the box in front of “Take item location from checkin record.” This overrides whatever is in the item template you are using. This could be useful when using one magazine item template but you have magazines in Adult, Young Adult and Juvenile location codes. If you set up the checkin card correctly the location code will be automatically filled in. If you enter the call number in the checkin card, each item record will automatically use that call number. In your template you would only have to prompt for and change ICode 2.
If you wish to be prompted to claim late issues during checkin, check the box in front of “Prompt to generate claims during checkin.” This means whenever you open a record and an issue is late (not checked in during the expected time period) a pop-up message will ask if you wish to claim those issues. Some staff find this annoying and do not check this box; they wait to claim all late issues on all checkin cards at once when doing claiming maintenance. See the page on Serials Claiming for more information.
Check the box in front of “Add supplements and indexes” so you will have the ability to add a supplement when you need to.
Check the box in front of “Show ‘Claim All’ button in Claiming mode” so when you do claiming maintenance you can claim all the late issues on a card at once if you choose to. If you leave this box unchecked you will have to click on and claim each box individually.
At the bottom in the box after “Recent check-in history” fill in the number of records you want to show in your recent search history for checkin cards. Default number is 5.
Click OK when you are done to save your changes.
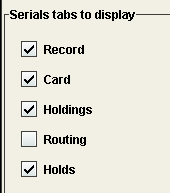
On the Tabs tab, under the section “Serials tabs to display” uncheck the box in front of Routing unless you use it. Routing is for libraries with a large number of staff that route issues of magazines to certain staff members. When not used it’s better to not have that tab show. Click OK to save the change.
Macros
Macros are very useful when you have to enter the same string of text over and over. Enter that text into a macro and you can insert it when you need it with just a keystroke or two. In Sierra there is room for 44 macros in your login. They are shared across all functions so you will have to choose which ones will be most useful to you in the work you do. If you have your own login, you can make these decisions for yourself. If you are using a shared circ login the needs of all who use it will have to be considered.
To create macros, from Admin – Settings, click on the Macros tab. There are 4 tabs across the top. No modifer means you use the F key by itself. The other tabs list macros that are used with that key (ALT, CTRL or SHIFT) in conjunction with the F key. Choose where you want your macros for Serials to go. Putting them together will help you remember where they are.
Most useful in Serials will be macros for use in the “Library has” statement in the checkin card. This is where you state how many issues of that magazine your library keeps. If you keep all magazines for the same amount of time, or one period for monthly magazines and another period for weekly magazines, you can create macros for each time period. If your library does not circulate the current issue of a magazine, that needs to be stated in the Library has statement and a macro is a good way to consistently enter that information. See the page on creating checkin cards for more information on the Library has statement.
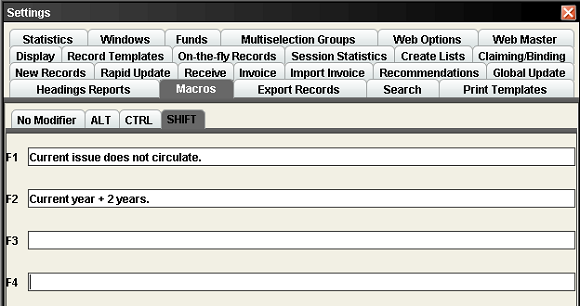
After entering the text for macros, click Save Settings to make your changes permanent. Click OK to close the Settings window.
Templates
You will need a template for a checkin card and a template (or templates) for your item records.
Go to Admin – Settings and click on the Record Templates tab.
Checkin Template
Change the Record Type to CHECKIN.
The template for your library should be on the left side under Preferred Templates. If it is not there, scroll down the right side column to find it. Highlight it and click the left-facing arrow between the columns to move it under Preferred Templates. If there is not one for your library, you can create one by clicking on New at the bottom of that screen.
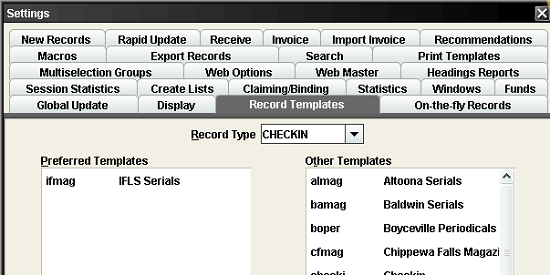
Click on your template to highlight it, then click Edit at the bottom of the screen to open it. If you clicked New to create one, your template will be blank.
Carefully check each field making sure there is a value in every fixed field even if it is a -. Nothing should be completely blank. The only field you do not fill in is CLAIMON as that is a system-controlled field that is automatically filled in when a magazine is claimed. Every library is assigned an RLOC number that must be filled in. It stands for Received LOCation and is attached to the library’s Serials unit. If you do not know your library’s RLOC number contact MORE staff.
In the LOCATION field enter the location for magazines that is used most. If you have more than one magazine location code, prompt this field so it will pop up during card creation and you can change it to the appropriate code for the magazine you are working with. Having the correct code here is vital if you are using the “Take item location from checkin record” option (see Options above).
If you get your magazine subscriptions from a vendor (Ebsco, Demco, MUSE), fill in the code for that vendor in the VENDOR field. See Vendor Records below. If you have more than one vendor, prompt this field so when creating a new card you can change it if necessary; “none” is used here when ordering directly from the publisher.
To add the LIB HAS statement, click Insert from the top right toolbar and scroll down the drop-down menu to select LIB HAS and click OK. The Library Has statement displays in the online catalog to let patrons know how many back issues you keep. Enter text here to indicate the length of time your library retains back issues, using year or years or months. For example, “Current year + 2 years” or “6 months”. If your library does not circulate the current issue you must add the statement “Current Issue does not circulate” to the end of the Library has statement; for example, “6 months. Current issue does not circulate.” In your template you can fill this line in with your most used statement and prompt it by clicking on the Prompt icon (>_). Entering these statements in to a macro (see above) will make it quick and accurate to add them to new checkin cards.
To add the call number, click Insert from the toolbar and select CALL #. Fill in the first part of the call number your library uses. When creating a new checkin card having the call number in the card will automatically transfer it to item records as they are created, saving time.
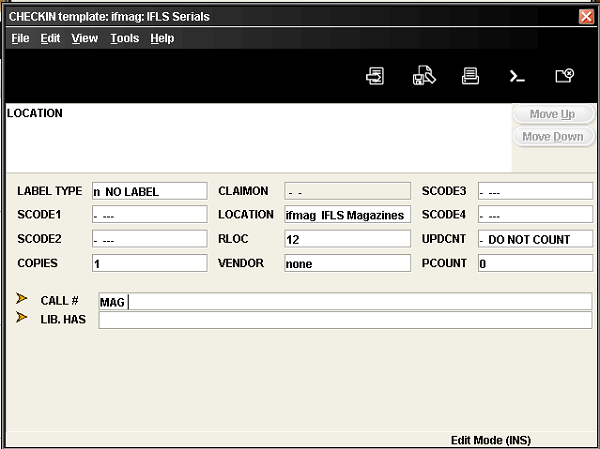
Save the record when you are done by clicking the Save icon, then click Close.
Item Template
Now check the templates for your magazine item records. Change the record type to ITEM. Check the list on the left under Preferred Templates and make sure that your magazine template is there. If you use more than one for different age groups, make sure they are all there. If one or more is not on the left, scroll down the list on the right to find them, highlighting and moving over when necessary. If needed, create a new template.
Highlight your template and click Edit on the bottom of the screen to open it.
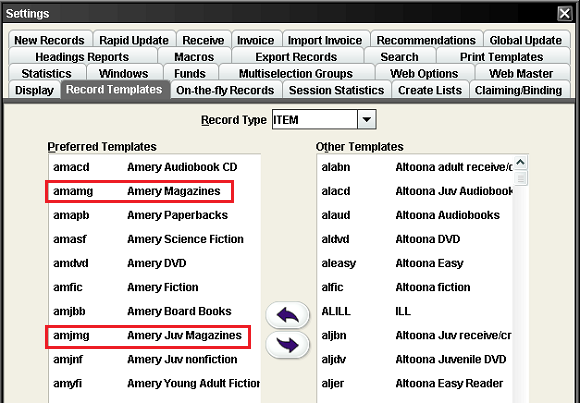
Check the fields to make sure they are correct. Every field that is not shaded must have a value in it.
If your library does not circulate the newest issue, use status a for “New No Checkout.” Otherwise status can be – for available.
If you use a prestamp for your magazine call numbers, enter it in the call number field. If you are taking the call number from the checkin card you don’t need to prompt it as it will already be filled in. If you prefer to fill it in as you go, prompt this field if you also enter title letters or may need to change it for Juv or YA titles.
Prompt for price if you input the actual price for each magazine. If you use a standard price, enter that and do not prompt that field.
The volume field is automatically filled in from the checkin boxes but carries the volume and issue numbers along with the cover date; we recommend deleting the numbers so having that field prompted helps you to remember to do that.
If you are using the option to take item location from the checkin record, prompt for ICODE2; then you can use one template for all titles.
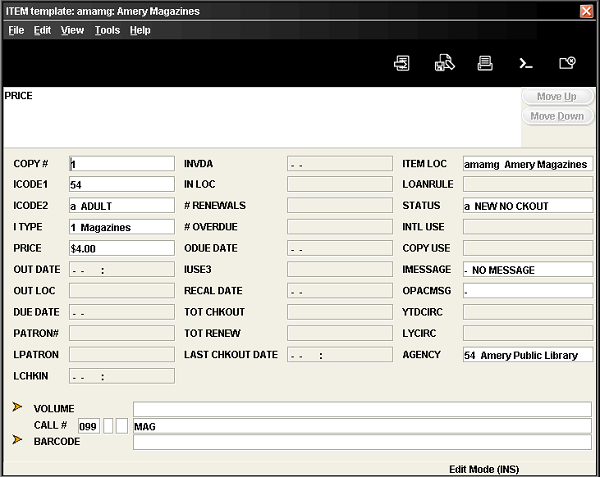
When you are finished editing, click Save to save your changes. Click Close.
Click Save Settings to save all changes on the Record Templates screen, and OK to close the Settings window.
Vendor Records
If you use a vendor for magazine subscriptions you should create a vendor record for each vendor you use.
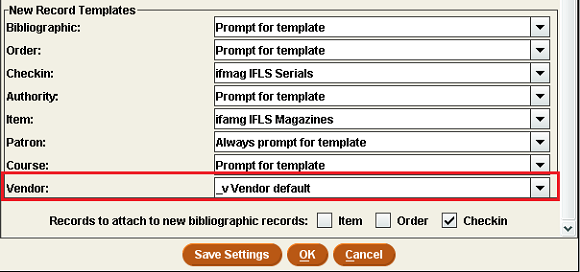
Go to Admin – Settings, and under New Record Templates, for Vendor select the Vendor default template. Click Save Settings, then OK.
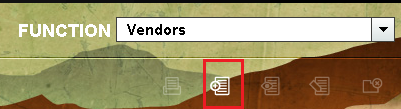
Switch Function to Vendors and click on New:
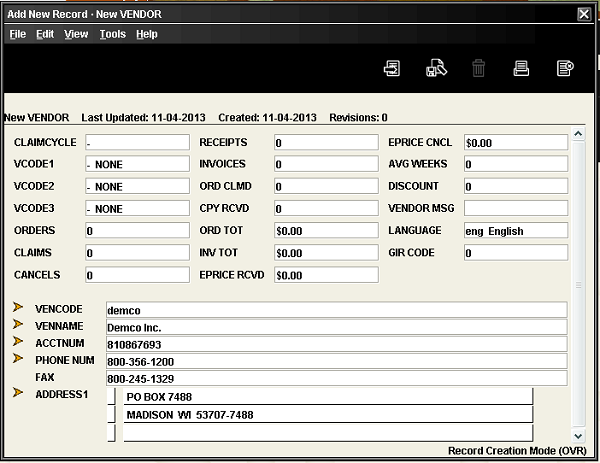
The Vendor record template will open. Fill in the fields as they pop up. The VENCODE is the vendor code; you can make it any 5 letter code you want that makes it easy for you to identify. This is the code that will go into the Checkin Card Vendor field.
Fill in the Name, Account Number, phone number, and address. You can insert fields if you wish to add a fax number, a contact name or a note.
When you are done, click Save. Here is an example of a vendor record:
To insert the vendor code into the Checkin card template, you can either just start typing the code in and select it when it fills in by pressing Enter, or you can double click in the field and in the Select a Vendor window change the drop down index box to either Vendor Code or Vendor Name and type in the appropriate information. Click Search, and when the Vendor record appears, click the Use Vendor Record button at the top of that screen. The code will fill in the field in the checkin template.